The first step in this process is to gather all the materials. You’ll need a black MASK, since that’s what is used as the base for the real INFECTED HAU. For ONUA, this shouldn’t be a problem at all, since he comes with one. You’ll also need paint and paintbrushes. Oh, and a finger, preferably your own. The paint brand I prefer is TESTORS MODEL MASTER ACRYL line, which is water-washable and harmless to most types of plastic. If you prefer to try a different brand, make sure it is acrylic or the paint might end up melting the surface of the plastic. All forms of acrylic are actually acrylic enamels, so if you find something with that on the label, it should work. The two colors I used for this MASK are AIRCRAFT INTERIOR BLACK (a very dark grey) and GUNSHIP GRAY (a medium grey). For brushes, small detail brushes are best. A #0 brush is plenty big enough for laying down the primer and base color, and a #10/0 or #5/0 is small enough for fine detailing while being able to handle larger details as well. Finally, you’ll need something to seal it so the paint will hold up to a bit of abuse without scraping clean. I like to use TESTORS DULLCOTE for flat finishes and GLOSSCOTE for glossy surfaces. In this case DULLCOTE is best because it will best emulate the finish of the INFECTED HAU. And again, if you prefer to use a different brand, make sure it is lacquer based, or it will probably melt the surface of the plastic. If you find an acrylic sealer, it should be safe as well, but I don’t recall ever seeing an acrylic spray sealer, and brush-on sealers never go on as smooth. Finally, if you plan to play with your painted MASK, you should probably pick up a primer , though I didn’t use one. Again, it should be acrylic, and the darker it is, the better the final product will look. I know that TESTORS makes a white semi-gloss primer, but I couldn’t say offhand what other shades they produce, since I’ve never bought them.
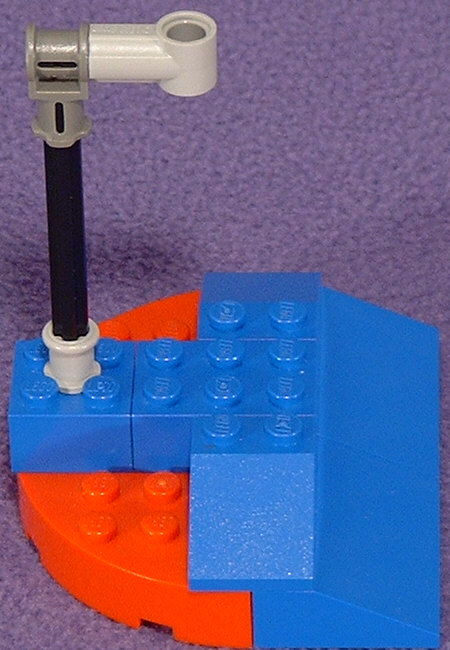
You’ll need to build a paint-stand next. In the above picture, I’ve shown the basic design I used. The stud on the mask will snap into the hole on the light grey coupler, with the center of the mask being over the dark grey coupler. The plus-rod should probably be a #6 or longer, and the shape of the base doesn’t matter as long as there’s a bit of weight to it to keep the whole thing from toppling over while the paint is still wet. If you care about keeping the pieces of your paint-stand clean, you’ll need to remove the plus-rod from the light grey bushing and wrap the entire upper section in masking tape, leaving only the mounting hole uncovered. Then, you’ll need to get some thick paper and poke a small hole in it, just big enough to reattach the plus-rod through it. While painting, I find it a lot easier to hold the plus-rod in my hand so I can reorient the MASK in any position, and then, when I’m ready to let it dry, I can plunk it down in the bushing so I don’t need to hold it anymore.
Now that you’ve got your paint-stand built and have all the necessary ingredients, it’s time to start painting. If you’re going to put on a primer coat, now’s the time to do it, and let it dry for a full day before moving on to the next step. Paint the entire forward-facing surface, and the inside surfaces of any holes, such as the eyes. When that’s done, or if you’re skipping the primer, take the AIRCRAFT INTERIOR BLACK paint and cover the entire surface, just as described for the primer. If there is any primer still showing, cover it. This is your base-coat, and you should let it dry to the touch before doing anything else, though you don’t need to wait a full day.
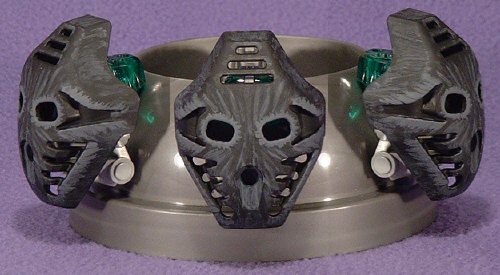
By this point, you should have an idea in mind for what you want your finished paint-job to look like, because this is the point where you need to start changing the look. Mine is designed to look somewhat hairy, similar to a tarantula’s head, since that is the basis for the ONUA KINO design.
The next step is to add in the highlights, using the GUNSHIP GRAY. Start by doing the major highlights, such as I did around the eyes and the hollows on the sides. You’ll need to lay the paint on thick enough to form solid patches of color. Follow this up by laying down thin lines or dots or whatever your chosen design is. Don’t worry if they look blotchy, since you’ll be toning them down in a bit anyways. Mine looked pretty ugly at first, but they turned out okay in the end. Again, once you are done with all of this, you’ll need to let the paint dry to the touch.
Next is the wierd part. I had to invent a new painting technique to get the look I wanted. I’ve called it Finger Brushing. (Kids, you should get your parents’ permission before doing this, as I will not be held responsible for any punishment you receive for doing this without asking…) You have to work quickly to do this right, or the paint will end up drying too much. First, you need to lay down a small patch of AIRCRAFT INTERIOR BLACK. The area should be about 1/4 to 3/8 inch per side, but no more. As soon as you’ve applied it, using the index finger of the hand you’re holding the brush with, swipe the painted surface so that most of the paint has been cleaned off, but a faint layer of color has been left behind. Continue to repeat this over the entire surface of the MASK until it is as dark as you like. If you darken it up too much, you can use the GUNSHIP GRAY in the same manner to help lighten it up a bit. Don’t worry about the look of the major highlights at this point if you feel that they have been made too dark. Once the rest of the MASK has the look you like, let it dry to the touch. It shouldn’t take nearly as long this time, as the act of wiping the surface with your finger removes most of the moisture of the paint.
After it’s dry, you can take the GUNSHIP GRAY and touch up the major highlights, being much more careful this time, as this should be the last thing you need to paint. If you only dip your brush a tiny bit and wipe most of it off on the bottle rim, you should be able to do very fine detail without letting big drops loose on the surface. When everything looks just the way you like, let it sit for a full day to allow the paint to cure completely.
When the paint is completely cured, take the whole stand to a well ventilated area (preferably a garage or shed) and spray it with the DULLCOTE. Get complete coverage on the painted surfaces, but don’t drench it to the point that the sealer is dripping off of it. Leave it in the well venitilated area to dry. After an hour or two it should be dry enough to bring inside without spreading nasty fumes around, but you should let it sit for another full day before playing with it, though you could probably pop it loose and attach it to a displayed model at this point.
0 Comments