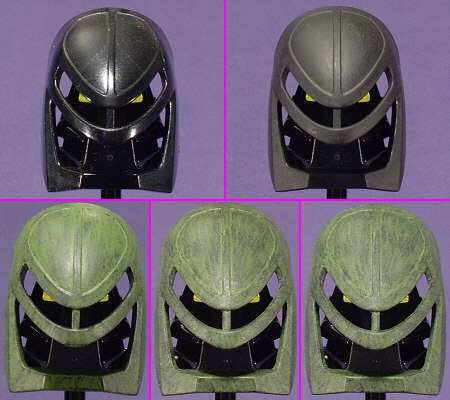
Of the four KANOHI KINO that I’ve painted so far, this one has been the most troublesome to produce. It’s probably tied with KAUKAU KINO for being the most difficult to get started on, but MIRU KINO went in a completely different direction than what I’d first envisioned. Before I describe how it got to where it is, here’s a bit about where it was supposed to go.
As I built LEWA KINO, I decided that the most appropriate motif for the MIRU KINO would be thorns, to match the rather painful looking spikes protruding from various parts of his body. I even figured out how I was going to do it. The ‘thorns’ would be very thin triangular shapes pointing backwards from the leading edges. Part of that idea did make it into the final design, but the original design was scrapped shortly after I first started laying on green paint. My idea for actually painting it was to just get the brush filled with paint and lay the brush-tip down to apply the paint, but I quickly discovered that this method doesn’t leave a nicely pointed tip to the ‘thorn’. At least not with any of the brushes I own.
So, after figuring out that it would take probably a week of small detail painting on a rather large scale, which I would have hated, I had to quickly figure out a new direction for this MASK, and with a couple spots of misapplied green paint already half-dry, I didn’t have much time to work with. The next logical choice was to go with a feathery look, since the big main feature of this design is the expanding wings.
In the attached photo, the upper left frame shows the original unaltered look of a black MIRU. The upper right shows it with the standard coat of Aircraft Interior Black from the Testors Model Master Acryl line. The lower left shows the immediate result of my running design change, with a ragged stripe-like pattern painted in Interior Green, also from the TMMA line. I applied the pattern using the same fingerbrushing technique that I’d used on PAKARI KINO. I was mostly pleased with the concept, but not the actual look, so I went back over it with a less intensive coat of the Aircraft Interior Black, applied in the same general design, resulting in the lower center picture. After letting it sit for a day or two, I hit it with a shot of Testors Dullcote to seal it and give it a nice flat finish, as seen in the lower right.
One last thing that should be mentioned is the one section that isn’t immediately noticeable. Since the first time I’d seen a MIRU up close, I’ve never been able to look at one without seeing a freakish leering grin. Since these MOCs are my take on what the TOA would become if they were corrupted by MAKUTA, I figured it would be a good idea to accentuate that look by leaving the flat section black. That idea didn’t work quite the way I’d intended, thanks to my inconsistently meticulous painting. In other words, I didn’t stay within the lines, so I had to hide it by painting that section Flat Black (Yep, you guessed it. TMMA line again.) before sealing everything else. The end result is that the flat part mostly blends in with the black TOA head behind it, which makes the mouth-shape more prominent.
0 Comments